Romeo and Juliet. Antony and Cleopatra. Homer and Marge Simpson. These are some of the great love stories of our time. However, perhaps no love story is greater than the natural synergy you’ll find in every screen printing shop across the globe — the star-crossed tale of screen tension and off contact.
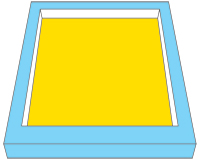
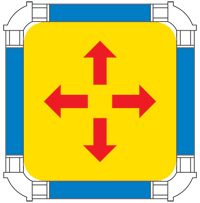
Put simply, screen tension is the tautness of the mesh that’s stretched across the screen’s frame, while off contact is the amount of space between the bottom of the screen and the platen where your substrate rests. If these two variables of print production aren’t in perfect harmony, your screen print job could be headed toward a very messy break-up.
Screen Tension
The tautness of your screen during production is paramount to achieving the clean and crisp looking print that you and your customers desire. Think of it like a drumhead — the tighter the head of the snare drum, the snappier the sound of your beat. If your snare drumhead becomes too loose, the rebound of the impact becomes more muddled and sounds less dynamic. The same fundamental results apply to your print.
Let’s look a little bit closer. There are basically two types of frames when it comes to general screen assembly: Static Frames and Retensionable Frames.
- Static Frames accommodate a sheet of mesh over the top of them using an adhesive bonding (typically a cyanoacrylate glue). Once the mesh is attached, it holds or loses its tension by the action of the mesh fabric itself. Once that mesh has lost its usable tension, or it breaks, it must be removed from the frame so that new mesh can be attached. Most Static Frames are made of metal, wood, or aluminum. Static Frames have a lower entry cost, but require mesh to be replaced more frequently, and are inferior in performance.
- Retensionable Frames (also referred to as Retens, Rollers, or Extenders), have the capability to add tension to the mesh that is attached. Once mesh is attached it can be manipulated and tightened at will by the user. There are three major brands of Retensionable Frames: Diamond Chase, Newman Rollers, and Hix Retensionable Frames. Retensionable Frames have a higher entry level cost, but provide more repeatability in mesh usage, as well as a higher technical performance.


Screens are consistently exposed to squeegee pressure during production, pressure washing during reclaiming, and moderate to high temps during drying. The general rigors of time slowly but surely reduce the tension in every screen. Whether you decide to have a Static Frame shop or a Retensionable Frame shop, one thing remains true: the mesh on these frames must have the correct tension measure to produce optimal prints.
 Tension is measured in Newtons, which is an absolute unit of force in the International System of Units. Britannica defines it as “that force necessary to provide a mass of one kilogram with an acceleration of one meter per second.” But fear not, you don’t need to be Sir Isaac Newton to achieve proper tension on your screens.
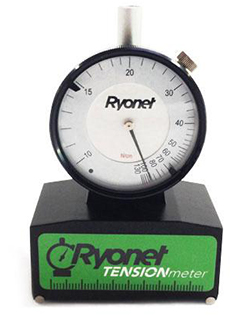
Newtons can be measured by a device called a Newton Meter (or Weighted Tension Meter), which looks a lot like a speedometer for screens. The Newton Meter should be placed on the center of your screen, mesh side up, to measure the tension of the mesh both vertically and horizontally to get your most accurate readings. The needle will point to the number that will correspond to the tension of the mesh from side to side, and top to bottom.
- Ideal tension will be in the 25 and up to 35 Newton range
- 20 – 25 Newtons is acceptable
- 15 Newtons and below, you will want to re-stretch your screen (or replace the mesh entirely if using Static Frames)
Loose screens can create a major problem with proper mesh release. If your screen mesh is too loose, the mesh will not release from the garment as you pull or push the squeegee across the stenciled image. When the mesh does release, the ink on the shirt will often try to hold onto the screen mesh when you lift the screen, causing a coarse or rough finish to your final print.
On multi-color jobs, loose mesh will stick to the previous colors on the shirt, and the ink picked up will begin to deposit onto the backs of your subsequent screens. Your prints will then start to appear muddy around the edges where colors touch within your image.
Measuring and adjusting the tension of your screens on a regular basis should become a normal operating procedure in every shop, and while optimal screen tension will lead to happy prints, it’s but one side of a two-sided relationship.
Off Contact
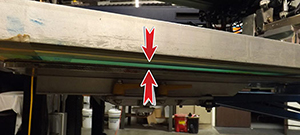
 As mentioned above, off contact is defined by the existing space between the bottom of your on-press screen and the platen holding your garment. There should always be a small space between these during production to achieve the best results while printing.
One of the main purposes of off contact is to create sharpness and maintain crispness through the stencil of your design on the screen. During the process of screen printing, the screen should only be touching the garment while the sharp blade of the squeegee is passing over the stenciled portion of the screen and applying ink to the fabric.
If your screen is tensioned properly, and your off contact is correct, the screen should have a nice snap and release off the substrate being decorated as the squeegee rolls over the design and pushes the ink through. This will create a clean break from screen to fabric, and leave you with a smooth, consistent ink deposit.
The typical distance of off contact is anywhere from 1/32 to 1/16, and at times up to 1/4 of an inch depending on the category of fabric you are printing.
For example, when printing plastisol inks on t-shirts, 1/16 of an inch should be enough off contact distance. You can measure the distance of the off contact with a tape measure, or by simply placing a quarter on each corner of your platen. When the quarters just begin to touch the bottom of your screen, you know your off contact is at 1/16 of an inch.
If using water-based inks for t-shirts, using a dime on each corner of your platen will give you the desired off contact measurement just below 1/16 of an inch. Since water-based ink is thinner, you’ll want the substrate to be closer to the screen for proper release.
Off contact should always be adjusted for the thickness of fabric you’re decorating, so while t-shirts may require a consistent standard of measurement, your off contact distance should be increased for more robust fabrics like hooded sweatshirts or fleece. Always keep this in mind while your production shifts across multiple substrates throughout the day.
Happily, Ever After…
Truly, the relationship between these two production variables is a delicate dance. If your off contact is too close to the screen, and the screen tension is too loose, the screen can’t properly snap away from the substrate when the squeegee pass has completed. This can result in a muddy print with undefined edges, or ink getting stuck in the mesh, resulting in inconsistent ink coverage.
Likewise, if your off contact is too far away from the screen, regardless of tension, you may not be able to properly transfer adequate ink through the screen onto the substrate due to the distance, which can result in lost design detail.
Failure to address both production elements could leave you waiting at the altar. By taking the steps necessary to ensure that your screens are properly stretched on a regular basis, and by measuring your off contact accurately for each unique job, you should never have to worry about ink coverage loss or dull design edges during production.
Optimal screen tension and correct off contact is a relationship built for the test of time that will have your shop delivering honeymoon prints that have your customers exclaiming, “I do!” every time you ask them if they approve.
